Friday, August 30, 2019

Roasted edamame: Protein Zap in a Snap


We try to eat high protein as much as possible.  We are not those Atkins, Keto, or any other extremists, but we like lots of protein.  In the constant search for snacks and grab-n-go foods, I tried roasted edamame this week.  

For those of you who don't know, edamame are soybeans.  You can buy them frozen, either shelled or still in the pod.  You see the pods often served in Japanese restaurants as an appetizer.  The shelled ones are great in salads, or just warmed and eaten like butter beans.  But, roasting them transforms them into a nutty, crunchy snack.  Kind of like high protein popcorn. And, it's really simple.


Thaw the edamame and dry them well.  Then, toss with some olive oil, Kosher salt and pepper.  Spread them out on a pan and roast at 375.  I stirred them around every 10 minutes for about a half hour, but just keep going until they look good and roasty to you.  The longer they are in the oven, the crunchier they get.  That's it. Enjoy!

Thawed and patted dry with paper towels

Simply edamame, olive oil, salt & pepper

About a Tablespoon or so

Spread out; stir every 10 minutes

 
Crunchy, nutty, crispy; don't forget to add some salt while they are still hot

Tuesday, July 23, 2019

Kid's at Camp; Let's Thai One On!

While my sweet girl is, and always has been, an adventurous eater, she's still a little on the mild side.  Since her father is on the Carolina Reaper side of life, I have to modify our food and he "enhances" everything with his own insane pepper oils.  Everything.

So, since the kid's at lacrosse camp, I decided to make some Pad Thai, as directed. It was spicy, rich, nutty, all the good stuff you want your Thai food to be, frankly.  

For those of you here in Columbia, you may be familiar with the amazing house dressing at our Miyo's Chinese restaurants. It is astounding and if you ask nicely, you can buy some from them.  And if you ask really nicely, your waitress might just give you some... 

So, this evening, the ol' ball-n-chain and I dined Chez Akre with some Pad Thai and a simple green salad with Miyo's dressing.  Even though Neil hates how our house will smell like fish sauce for a few days, the food was good.  Damn good.


Pad Thai cooks quickly, so it key to have all your ingredients prepped and ready to go.  What you see here is about 8 large shrimp, 4 oz. chicken in bite-sized pieces, 1 1/2 tsp crushed red pepper, 3 chopped green onions, 1/4 cup chopped unsalted, roasted peanuts, 2 Tbs fish sauce, 3 Tbs soy sauce, 1 Tbs sugar, 2 garlic cloves minced, lime and some bean sprouts. 


Start by sauteeing your garlic in about 2-3 Tbs veg oil.  Add your chicken and shrimp and cook 'em up.  


Oh, oops, I forgot to tell you about the noodles.  Take about 4 oz. dried rice noodles and put them in boiling water.  Take off the heat and let them steep for 5 min.  Drain and rinse with cold water.  Then, add them to your meats in the wok.


Add fish sauce, soy sauce, sugar and red pepper flakes. Mix in well then throw in about 1 cup of bean sprouts and your chopped peanuts. When the noodles are tender, push them aside and add 1 beaten egg.  Scramble it and mix it into the Pad Thai.  Lastly, add your green onions and the juice of one lime.  


And, viola!  You have a wok full of delicious Pad Thai.  Serve right away with some raw bean sprouts sprinkled on top and with a couple wedges of lime.  I think you'll find this rivals any restaurant Pad Thai you've ever ordered.  


Thursday, June 20, 2019

Ramen for Breakfast

I'm not  much of a morning eater, even though I know that I should.  But, when your daughter wakes you up with breakfast in bed, you get up and eat.  

My 13 year old has already had a busy summer. Camp in the mountains for a week, then directly to a lacrosse tournament in Charleston, so this week she's taking a break.  Her room has been cleaned (what?!?) and rearranged, list of chores has been decided and today she decided to embark on some cooking.

So, I'm woken to a big, hot bowl of ramen this morning.  Lots and lots of ramen.  Turns out, she had used 2 packages of noodles, which is about 5 times as much as I can eat in one sitting. She cooked her noodles in chicken broth, added chopped chicken and scallions and topped it all off with a poached egg.  This was a first attempt at poaching.  So, to quote Vivian, "Gordon Ramsay would say 'What? Are you eff'ing kidding me, mate?  This egg is as hard as my Gandy's flip flops.'" I think she's being a little hard on herself.  

Saturday, March 9, 2019

I'm an Instant Pot Convert

Danger, danger, Will Robinson!

 You've probably heard people raving about the Instant Pot, right?  I have too. When I learned that it is a pressure cooker, instantly (ha, see what I did there!) I had flashbacks to my mom's old school pressure cooker from the '70s. (See the horrifying contraption pictured above.)


You remember, right? It was a huge pot with a locking lid, that little rocking doo-dad on the top of the lid that would jiggle back and forth and then, of course the WARNINGS.  "Kids, whatever you do, DO NOT TOUCH the pressure cooker.  Don't even go near the pressure cooker.  Don't even look at it."  It was so terrifying that I couldn't even tell you what mom cooked in that damn thing.  I just stayed the hell away from it.  

Then, there's the storage issue that I have.  I live in a smallish mid-century downtown house. Storage is at a premium. I have 4 crockpots (it's a long story), a rice cooker (what??), a stand mixer, a pasta attachment, stock pots, etc.  You get it.  But, all of a sudden, my beloved Ball-N-Chain asked me if I'd ever heard of the Instant Pot.  Then, more and more frequently, he brought up the Instant Pot.  Finally, it dawned on me.  The man wants an Instant Pot.

Viola. 


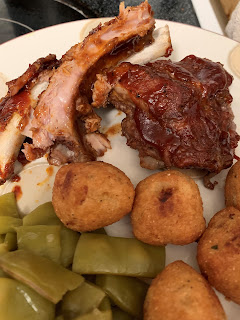
Long story short, I've joined the Instant Pot world. Man, what a crazy invention this thing is.  It's a pressure cooker, a crockpot, a saute pan, a yogurt maker, a jar sterilizer, a rice cooker and as we learned tonight, a RIB COOKER. Yes, folks, I made BBQ ribs tonight in under an hour.  An hour, that's only 60 minutes, friends. 

I can't take any credit for this recipe; I googled it.  Because of my childhood terror surrounding the pressure cooking phenomenon, I am strictly following step-by-step instructions.  I found B1G1 ribs the other day and assumed that someone could teach me how to cook them in the Instant Pot and Google doesn't disappoint.  

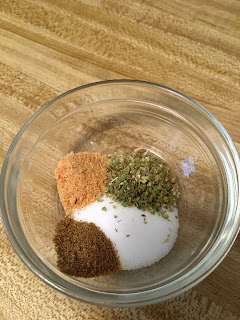
I made a dry rub, which I rubbed all over the meat (duh!). I used the Instant Pot trivet and coiled the racks and stood them up on their sides.  Cooked at high pressure for 20 minutes.  Yes, 20 minutes.  Now, the pot takes about 15 minutes to come up to pressure, then actual cooking time is 20.  Then, I took them out, laid them flat on a cookie sheet, brushed with sauce and broiled for about 6 minutes.  Done. 


CAN YOU BELIEVE THAT?  

I am amazed.  They were ridiculously tender, falling off the bone, and it was all ready in record time.  I think the beloved Ball-N-Chain is happy that we've joined this Instant Pot society. 


Served with pole beans and hush puppies.  I used a Kansas City style BBQ sauce; I cheated, not homemade this time.  

The moral of this story?  The Instant Pot is pretty darn cool.  I found out today that a friend of mine just killed her crockpot, so I'm donating one of mine.  That opens up some storage!  Anyone need a rice cooker?

Monday, November 26, 2018

The Whole Enchilada

It seems that being a mom of a middle schooler is more demanding of my time than anticipated.  I've still been cooking, of course, but finding time for pix and writing has been a challenge.  But, I'm here now, so let's talk about Mexican food.


I'm willing to bet that Mexican is the most popular cuisine in America.  Everybody loves Mexican. Chances are that you have taco shells in your cabinet, cans of refried beans in your pantry and tortillas in your fridge.  Like everybody, so do I.  It's great to have these staples on hand, especially for those hectic week nights when you can whip up some tacos in the blink of an eye.

One of our favorites is enchiladas.  The beautiful thing is that they really aren't hard to make, you can create a filling out of anything and they freeze beautifully.  While canned sauce is convenient, I'm here to tell you that it's soooooo much better if you make it yourself.  (Refried beans too, but another time!) My daughter often finds the canned enchilada sauces too spicy, so making my own solves that problem.  And it's easy...it has a few steps, but they aren't difficult and the result is so worth your while.


 Place about 8 dried guajillo peppers in a saucepan.  Cover with water and bring to a boil.  Then, turn off the heat and let the chiles soak for about 45 minutes.


Then, you remove the stems and split them open to remove the seeds.  The seeds need to go because since they were dried, they are hard and yucky.  You don't want hard and yucky in your sauce.


Save the soaking liquid.  It is like liquid amber.


Next, place your chiles in the blender with a cup of the soaking liquid and give them a good whirl.  You want to let it run for a minute or two so that the skins get finely ground.  Then, strain the puree, using a spoon to press on the solids to get all the chile puree that you can.  Rinse your blender with another cup of the soaking liquid, then pour it over the solids in your sieve.  Press some more, then discard the solids. 


Heat 1 Tbsp oil over medium heat, add 1 garlic clove, halved.  When the garlic becomes fragrant, discard. Add 1 Tbsp flour to the garlic oil and cook for about a minute.  Next, add the guajillo puree to the roux and mix well.

  
This is 3/4 tsp salt, 1/4 tsp oregano, 1/4 tsp cumin and 1/4 tsp of garlic powder. Add these spices, along with 1 tsp white vinegar to the sauce.


Bring to a boil, then reduce heat.  Cook, stirring occasionally, until sauce becomes slightly thickened.  Taste it and adjust salt to your taste. That's it.  Homemade enchilada sauce.  I use this sauce for my tamales as well.  

So, why is it so great to make your own?  First, it's easy.  Second, it's inexpensive.  Dried chiles are not a pricey item and you can even find them at places like Wal-Mart, if you're willing to sacrifice your humanity and enter a Wal-Mart, that is.  The rest of the ingredients are in your kitchen right now.  And third, it simply tastes so much better than the canned product.  No added sugar or excessive salt either. Give it a try and you'll find yourself doing the macarena right in your kitchen because you are so excited and pleased with yourself!  Ole!


Friday, July 13, 2018

In the style of the Shepherd


Around here, the little Akre crew can dig on some Mexican food. As children of the 70's, Neil and I are nostalgically fond of the good ol' American Tex-Mex ground beef taco with crunchy shell, cheddar, onion, tomato, lettuce, etc., you get my drift.  Make no mistake, I still make these kind of tacos every time we have one of those busy weeknights. I.LOVE.TACOS.


But, as we have aged and evolved, we have been fortunate enough to actually experience Mexico and myriad really, good, authentic Mexican restaurants and Mexican people here in the U.S.  As time has gone by, our knowledge (by "our," I mean Americans in general) of true Mexican food has gradually been realized.  True Mexican style tacos are something relatively new to many Americans, as many of our brethren still flock to the standard Tex-Mex "Somebody's San Jose" and order crap like the "Speedy Gonzales" or the ubiquitous "Lunch #3."  


One of my favorites is Tacos al Pastor.  I've always wondered about the "al" part of this name, so I checked into the history of this dish.  From what I've read, this dish was actually introduced to Mexico by Lebanese immigrants.  It was inspired by schwarma, also one of my favorite dishes, so this is all starting to make sense.  If you are unfamiliar with "al Pastor," it is a mixture of marinated pork, onion and pineapple served in a warm corn tortilla and topped with finely diced onion, cilantro and a squeeze of lime.  

So, as you can probably deduce by now, I like making stuff at home.  I recently got a shipment of beautiful boneless, center cut pork chops.  Pastor time!  It is surprisingly easy to make and so worth the small amount of effort.

Guajillos:  I use these for enchilada sauce, my tamales and now for this!
 
Chop up those finishing touches for your tacos


Boneless pork & pineapple in marinade
 
Draining off marinade

 
Cookin' up that goodness!


Taco al Pastor with homemade refried beans
Tacos al Pastor
5 dried Guajillo chiles
1 chipotle pepper 
1 med onion, chopped
1 can pineapple chunks 
1/8 cup vinegar
1 Tbs minced garlic
1/2 tsp cumin
1 lb (roughly) boneless pork, cut into small cubes
1 Tbs canola oil
Corn tortillas
Chopped cilantro
Chopped onion
Wedges of lime

1.  Boil about 1 cup water and soak chiles for about 10 min to soften.  Cool, then remove stems and seeds.

2.   Chop onion, strain pineapple and reserved the juice.

3.   Transfer guajillo peppers, chipotle pepper, half of the chopped onion, 1/2 of pineapple juice (save the rest for another use), vinegar, garlic and cumin in food processor.  Puree until smooth.

4.   Transfer mixture to saucepan and bring to a boil; cook until raw onion taste subsides, about 2 minutes.  If you want it spicier, add some adobe from the can of chipotles. Cool then combine in a ziploc bag with pork, remaining onion & pineapple.  Refrigerate and marinate at least 2 hours, up to 24. 

5.    Drain meat/pineapple mixture & discard marinade.  Heat a bit of oil in skillet.  Add pork and pineapple and cook until dark golden brown and cooked through, about 15 minutes. 

6.   Dry "fry" corn tortillas in skillet to soften.  Add meat, pineapple, finely chopped onion, cilantro and give it a good squeeze of lime.


I served our tacos with homemade refried beans. These are so simple, you'll wonder why we ever bothered buying them in a can.

1. Take a 30 oz. can of pintos and "lightly" drain them.
2. Heat about a Tbs oil and add a couple of garlic cloves.
3. When they are lightly brown, crush them up with a fork.  Or, if you prefer, just use minced garlic.  The point is to flavor the oil. 
4. Add beans, 1 tsp chili powder, 1 tsp cumin, salt to taste.
 5.  Cook about 5 min until beans are heated.  Mash with potato masher until consistency you like.  Squeeze in some lime juice, stir and enjoy! 


LinkWithin

Related Posts Plugin for WordPress, Blogger...